GSS 30 Day Challenge - Short Game - a podcast by Marty Griffin brings you top golf content from Golf Digest Top 40 under 40
from 2016-04-08T06:00
::
::
Glad to see that you're back for the practice routines for week 2! Now please excuse the upcoming bold font, but this is a crucial part to any practice you're doing and it will be a theme that's applied through the rest of the 30 day challenge.
Your success rate MUST be between 30% - 70% to be experiencing improvement.
So keep that in mind when you are doing these practice routines. If you are able to do them with better than a 70% success rate you need to make it harder and vice versa if that success rate is below 30%.
So on to the good stuff!
This week we are going to look at some short game practice routines. Let's start with the flat stick.
Practice #1 Putting
Here's the thing, just about every instructor is going to look at your alignment first so let's get that out of the way right now.
Step 1: Pick a putt that's straight, about 10 feet long.
Step 2: Set up
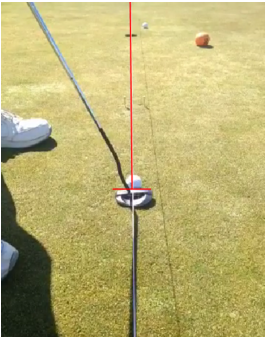
Check with your course to see if it's okay to put chalk on the practice green. Then draw two lines, I like to use an actual builders chalk line. Line #1 should be the intended starting line of your putt. Line #2 should be a short line that runs perpendicular to that line and should be at the very beginning of line one forming an uppercase T. (See the picture below)
 |
Use line number #2 to align your putter face throughout this drill. Go through your entire preshot routine and hit a few warm up putts. Monitor if your putts roll down line #1. If they do, then you know your path is good!
The real test comes from The Gate Drill.
- Place two tees slightly wider than a golf ball about three feet away from your starting point.
- Try to hit the putts so they go between the tees.
- After 10 putts see if you are in that 30%-70% range. If so, then you are still learning. Repeat the drill two more times.
- If you are under 30% widen the tees making it a touch easier and repeat the drill two more times.
- If you are over 70% move the tees a little closer to the hole, (away from you) and do the drill two more times.
- After 10 putts see if you are in that 30%-70% range. If so, then you are still learning. Repeat the drill two more times.
Our second practice routine is called the Putting Ladder Drill. This one builds the confidence to make those knee knockers and other pressure putts. This is going to start sounding repetitive but always make sure you go through your complete preshot routine when hitting any shot, even these practice drills. Anyway, here's how we do the Putting Ladder:
- Find a fairly straight putt that's about 30 feet long and set a ball down every six feet (6', 12', 18', 24', 30') all on the same line.
- Set an extra club (or towel, or flag, anything works) about three feet behind the hole.
- Hit each putt making sure the ball reaches the hole but DOES NOT hit extra club laid behind it.
- This means you don't actually have to drain it, just make sure you stop it in that zone between the cup and the club.
- If you leave the putt short of the hole or go too far and hit the stick, then you have to start over.
Again, we do this drill 10 times to see if we are in that 30%-70% success zone. If you make it all the way through the five putts without starting over that's a win! If you miss one and have to start over, that's a missed attempt (it counts toward your 10 reps).
This is a pretty tough drill for most people starting out so don't be surprised if you have to tone down the difficulty. If you are under 30% success and need to make it easier just shorten the distance between each ball to about 3 feet. (Make sure you keep track of the new distance between each putt!)
If you need to make it harder (over 70% success) you can add another ball at 36' or even just increase the distance between the ones you have (7' instead of 6').
The real beauty of this drill is that it gets us familiar with experiencing failure. That way when we are out there on the course standing over a really tough putt, we've already experienced that emotion and taught ourselves how to handle it. Which helps to eliminate fear in the moment.
Here's a quick little video from LPGA professional Katie Detlefsen that gives you the general idea for set up and execution. - Please remember to go through your entire pre shot routing before every putt though!

Our second structured practice is for chipping.
Practice #2 Chipping
Practice #2 Chipping
This practice routine is going to sound eerily familiar. It's the big brother to the putting ladder, it's the chipping ladder!
The set up is similar pretty similar.
- Pick a chip shot about 30 feet away
- Draw a chalk circle (6' diameter) around the cup.
- Set cones (or draw more chalk lines) every ten feet creating landing zones.
- Take your golf balls just off of the fringe (no more than five feet).
From here we emulate the putting ladder.
- Starting with the zone closest to us we chip the ball trying to land it in that first landing zone
- It must release and finish inside that six foot wide circle around the cup.
- If you miss your landing zone or the circle you must start over.
If you hit your landing zone target and your stop the ball inside the circle then you get to move on to the next landing zone!
Remember your preshot routine each time, and don't be afraid to change clubs!
Remember your preshot routine each time, and don't be afraid to change clubs!
You can add or subtract landing zones as needed to maintain that 30%-70% success rate.
This drill helps eliminate fear, just like the putting ladder but it also adds some creativity to your game because you learn to alter you carry distance and ball flight around the greens.
Practice #3 Pitching
Here we are looking at the "fun" in between zones that a lot of people struggle with. For this drill you will need to find a facility that has a designated pitching area or a random patch of grass where you can practice (about 80 yards).
- Start at 20 yards away from your target and place five balls. Continue every 10 ten yards until you are 80 yards out.
- Hit each of the 5 balls to the target at each station tracking how many times you were withing 10 feet of the target (roughly).
- Reset, this time with only three balls per station.
- This time our goal is slightly different
- 1st ball should land just beyond the target
- 2nd ball should land just short of the target
- 3rd ball should right on the target
- Reset the stations again with only 3 balls and complete the exercise again (long/short/on target).
- The fourth and final time we will reset the stations with our original 5 ball set up and try to hit the target exactly
- Record your percentage within 10 feet again. It should've gone up compared to the first time!
This drill is awesome because
A) It helps you practice distance control, which is crucial for scoring
B) It helps you separate the pin from your target because those two things are rarely the same!
Make sure to share you progress in the Golf Strategy School Facebook Group to get that added support!
I'll see you next Monday with the new set of practice routines.
I'll see you next Monday with the new set of practice routines.
Further episodes of Golf Strategy School Podcast
Further podcasts by Marty Griffin brings you top golf content from Golf Digest Top 40 under 40
Website of Marty Griffin brings you top golf content from Golf Digest Top 40 under 40