A more effective way to align your grinder - a podcast by Scott Rao
from 2019-01-30T19:32:30
From Scott
I recently ranted, I mean posted, on Instagram about the unnecessary frustrations of aligning the burrs of an EK grinder. Mahlkonig designed the EK for grinding spices (not coffee) and was flat-out lucky that I took a chance on buying an EK for coffee in 2010. The first day I used the EK in Montreal I achieved 23% extractions in my Fetco and word spread rapidly throughout the coffee industry. Cafes all over Montreal began buying EK’s and then Mahlkonig lucked out again when Matt Perger used the EK in his excellent World Brewers Cup routine. Since those events, Mahlkonig has sold many thousands of EK’s and has had the nerve to raise the price without addressing the issue of the machine’s atrocious alignment. I’ve used over 100 EK’s and would estimate that at most 10% of them were well-aligned right out of the box. The terrible QC of EK manufacturing has cost us collectively tens of thousands of hours trying— often unsuccessfully— to accomplish something that Mahlkonig could have accomplished in minutes per grinder sold.
When someone has manufactured a commercial grinder for less than $5000 USD that grinds better than the EK and is also well aligned out of the box, please contact me: I will happily promote your machine for free after testing it to my own satisfaction.
Over the past nine years baristas have become more aware of the issue, and some homegrown re-alignment methods have partially solved the problem. Unfortunately, those methods require an hour or two each time the burrs are removed or replaced. (Matt’s tutorial HERE is excellent.)
Upon reading my rant/post, Mitchell Hale commented on the Instagram thread about a method of sanding the burr carriers to realign the burrs. I asked Mitchell to share that method as a guest blog post and he graciously gave his time to writing this how-to. I have not tried the method yet (I don’t have an EK at home and my current home grinder is well aligned) but I have faith that it will become the new standard for burr alignment for many flat-burr grinders, not just the EK. This method may take three to four hours, but once it is done, you will not have to repeat it each time you remove or replace burrs. This seems like an excellent investment of time.
Mitchell has agreed to reply to some comments here, but please be sure to read this post several times before asking questions. Please don’t ask questions such as “will this work on some other type of flat-burr grinder?” The answer is: “probably” but neither Mitchell nor I have tested this method on a variety of grinders. Posts like this are to spur ideas and conversation, nothing more. Do some research, try at your own risk, and give back to the community by sharing your results and insights. Thank you.
Guest Post by Mitchell Hale
Before we begin I want to give credit and thanks to the community at kaffee-netz.de, and to Jürgen Peter Ohler (Jupe3.0) in particular, for coming up with this idea in the first place. I’d have never been able to put together this guide without their pioneering of the method.
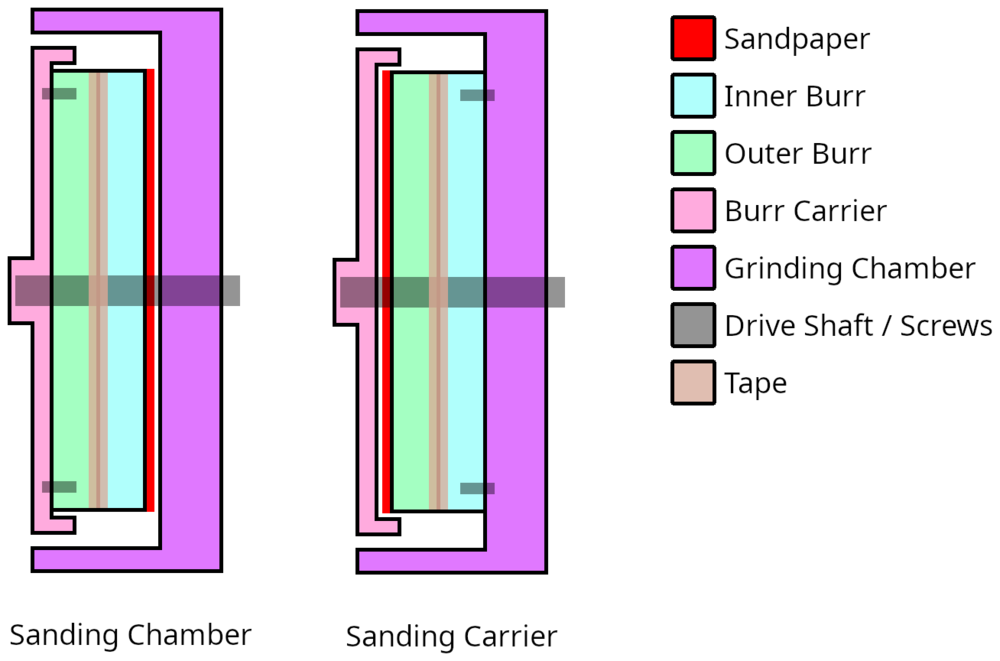
I’d like to introduce you to a simple and straightforward way to align your grinder that uses the inherent properties of the grinder itself, rather than relying on user observations like methods such as marker alignment. This method uses readily available supplies to allow the burrs to alter the grind chamber and the burr carrier so that the burrs are aligned parallel to each other and perpendicular to the drive shaft without shims. To achieve this, we’ll be attaching sandpaper flat to the back of the burrs in two different configurations (see diagram) to sand both mounting surfaces.
This method works easily with any grinder with an EK-like burr pattern. With the inner burr fixed in the grinder chamber and the outer burr on a spinning carrier that goes over the drive shaft. EK43, Bunn G1, etc.
First, you're going to need a few supplies
-----
Spray adhesive, I used "Loctite General Performance Lightweight Bonding adhesive", available at https://www.amazon.com/Loctite-1712314-13-5-Ounce-Aerosol-Adhesive/dp/B003VWJ5GO or most hardware stores. You want something light since it'll be coming off frequently.
Oil for the sanding, I used "3-IN-ONE oil", available at https://www.amazon.com/3-IN-ONE-Multi-Purpose-Oil-8-OZ/dp/B0083V8MAS or most hardware stores.
Sandpaper of several grits, I used a bunch of big packs from the hardware store, but a multi-pack would be ideal. We’re only going to need a couple sheets of each grit size. Make sure it's wide enough for your burrs. 98mm for EKs, 80mm for Bunns, etc.
Adhesive remover, I used Goo Gone, available at https://www.amazon.com/Goo-Gone-Pro-Power-Spray-Gel/dp/B00SPHYQXM and most anywhere you can get cleaners. I do want to note that Goo Gone is not a food safe product, but you can clean it off thoroughly. If you do feel concerned, I find that canola oil does a good job of stripping the adhesive as well. Be sure to clean it thoroughly too, for different reasons.
An X-Acto style knife. Most hobby stores, hardware stores, and office supply stores will have something suitable.
Some rags to wipe up the metal filled cutting oil. Expect to throw them away after, so get something cheap.
Masking tape.
The thinnest tape you can find. It has to fit between the sweepers on the burr carrier and the outer burr.
A screwdriver for the burr chamber and another for the burrs themselves. I highly recommend a torque screwdriver for the burrs to put them in with more even tension. It's not strictly needed, but if you can get even a cheap one you can be a lot more confident you’re not over tightening one side.
UNPLUG YOUR GRINDER AT THIS POINT. LEAVE IT UNPLUGGED UNTIL FINISHED.
Now, for the chamber sanding
-----
Cut out 6 squares each of about 220 grit, 320 grit, 400 grit, and 800 grit sandpaper that will fit the entire burr on them. If you like shine and don't mind the time it takes, throw some higher grit in there too.
Take the outer burr carrier out of your grinder, remove the spring from it, and set it aside. Then unscrew the inner burr, you'll be attaching the sandpaper to this burr first.
Take one of the squares of your 220 grit and spray the back lightly with spray adhesive, then press your inner burr on it. Wait for it to dry. Then cut off the excess sandpaper from the edges and middle leaving only a ring of it.
Tape your inner burr to the outer burr that's still screwed into the burr carrier. You can work around the sweeper post things with masking tape, or try to get the tape under them with the thin tape.
Apply cutting oil to the sandpaper.
Put the assembly of two burrs in the burr chamber (making sure the spring is out of the carrier) and spin it around with gentle pressure. Take it out from time to time to wipe off the oil and metal. Continue until the sandpaper is worn out.
Repeat 3-6 two more times to use 3 discs. You'll need the adhesive remover to clean the burr to attach the next disc.
Repeat steps 3-7 for each size of sandpaper. You should use 3 discs for at least 220 and 320, and can probably go down from there. Those sizes do most of the work and the rest polish.
Now your chamber is sanded to be perpendicular with the driveshaft. But your carrier does not perfectly match, not yet.
Now, for the carrier sanding
-----
Screw your inner burr back into the grinder. Ideally with a torque screwdriver to keep things even. Unscrew the outer burr from the carrier
Take one of the squares of your 220 grit and spray the back lightly with spray adhesive, then press your outer burr on it. Wait for it to dry. Then cut off the excess sandpaper from the edges and middle leaving only a ring of it.
Tape the outer burr, without carrier, to the inner burr. This can be a pain to pull off depending on the individual grinder, and you'll need some thin tape. The sweeper posts will need to be able to fit over the tape this time.
Apply cutting oil to the sandpaper.
Put the carrier over the two burrs that are affixed to the chamber, apply gentle pressure and spin it to sand down the carrier. Same way you did with the chamber sanding.
Repeat with multiple grits and multiple discs of each grit the same way you did with the chamber.
Your carrier now has a parallel surface to your chamber. Which is also perpendicular to the driveshaft! Congratulations, your grinder is aligned the best it can be this side of a machine shop!
Final steps and notes
-----
Don’t worry about matching things like my grit numbers exactly. They’re there as guidelines for cutting grits and finishing grits.
Your zero will change significantly. We’ve removed material from both burr mounting surfaces, so they will be physically further apart at the same settings until rezeroed.
Make sure to clean your grinder before using it.
Make sure to clean your burrs thoroughly of both adhesive and adhesive remover before reinstalling them.
Make sure to flush your grinder with at least a few doses of coffee, ideally more, before using it.
When you're applying spray adhesive, have it in a box or other contained area to not make a mess.
Rubbing alcohol, acetone, dish soap, etc all do nothing on the spray adhesive. You do need an adhesive remover or oil. Trust me, I thought I wouldn’t need it.
If you use any water on your burrs for cleaning, dry it off right away. Especially for standard uncoated tool steel burrs.
You can repeat the chamber sanding once the carrier is done for a theoretically slightly more perfect surface, but it's not really necessary.
Sanding times are for standard sandpaper, and should last several minutes to 10-20 minutes tops for a sheet. If using any especially long lasting sandpaper and it isn’t wearing out at all over several minutes, you can stop after a few normal sheets would have worn out and move on to the next grit.
When cutting sandpaper around the burrs, make sure not to get it too tight. Remember, the burrs have to fit into the sanded area. If the sandpaper is cut too tight and leaves some of the burr face uncovered, the burr will end up sitting on the unsanded edge around the burr. It’s ok if it goes just slightly beyond as well. So if in doubt, it’s better to have a disc slightly larger than needed, than one slightly too small to work.
Further episodes of Q
Further podcasts by Scott Rao
Website of Scott Rao